
Recipe
Get Your Jelly On – Day 6: Victoria Sponge
![]()
![]()


Prep Time:
Cook Time:
Yield:
Yey! One more day till the weekend! Seriously, I can’t wait! This week has been flying by and I have had trouble to sleep for the last 2 nights. I know, it’s not good and I didn’t feel really well when I woke up this morning. I have to blame the weather as we had glorious and sunny ‘summer-like’ days in the beginning of the week, then the temperature plunged from 28℃-29℃ to 15℃-16℃. A huge difference, I know!
Anyway, we are into the 6th day of the Royal Selangor – Get Your Jelly On– 30-day Challenge! A new day, a new recipe and use the Royal Selangor Pewter Jelly Mould in a different way. When I said, I really spent time in finding possible ways to use the mould, I really did.
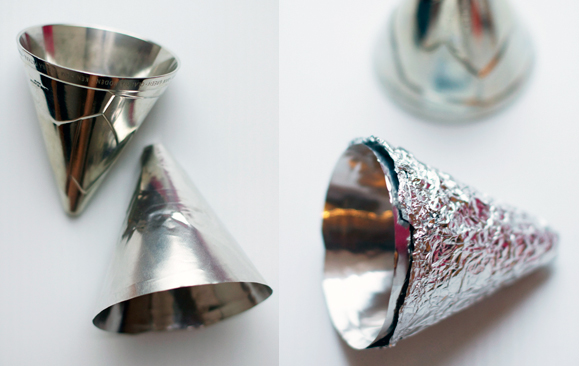
So, it was 2 nights ago, I kept thinking of the limitation of the jelly mould being not oven proof. Then, I had a sudden idea to make it very oven-friendly. My solution is using the jelly mould as a tool to help me to ‘clone’ a foil mould, with an exact shape so that it can go into the oven! Hooray! It’s such a useful jelly mould, to use is as a tool and to make things in it!
I have provided the following steps to illustrate how I have made it possible to bake a recipe in a cone shape – exactly like the jelly mould.
1. You need a thick foil roasting tin. Cut off all the 4 corners, which will leave you with only the base.
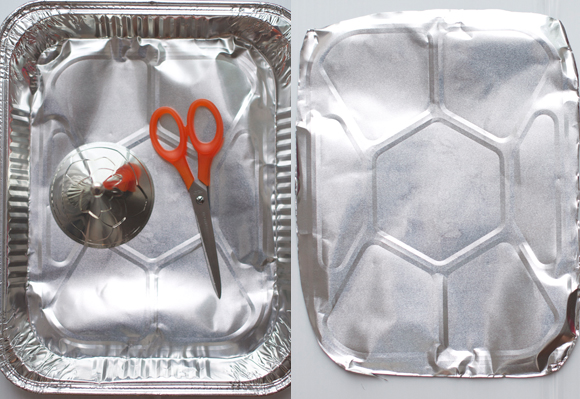
2. Use the jelly mould to roughly outline the size of foil needed, this includes the tip of the mould as highlighted in green. It is easier to estimate if you use the foil and wrap around the jelly mould to get an idea of the length needed to cover the mould totally. Of course, you need to leave a few extra cm to overlap the first layer.
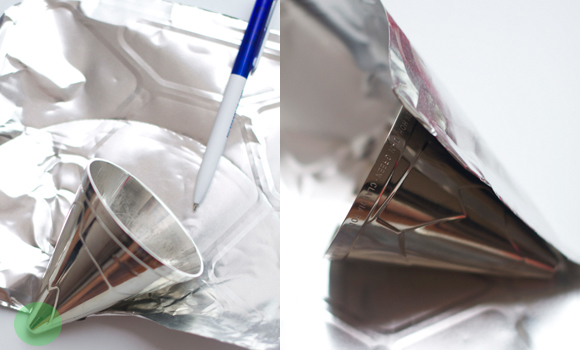
3. Use a pair of scissors to cut the estimate size of the foil, then slowly mould the foil around the jelly mould to get the accurate size. Cut off the excess.
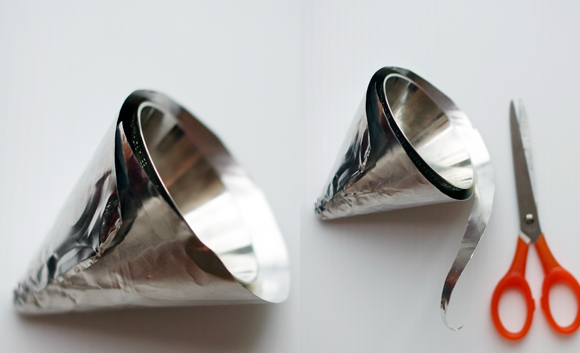
4. Once you get the exact size, wrap the foil around the jelly mould, make sure the tip of the mould is slightly flatten and not pointed, just like the original mould. You could use a heavy object to flatten it. Then, secure with a tape and leave for say 10 minutes or so to make sure it takes its shape as much as possible. Then, remove the tape but the foil still on the jelly mould, wrap a few layers of kitchen foils around the thick foil to maintain and secure the shape before taking off the jelly mould. The ‘clone’ mould is ready to use.
Get Your Jelly On – Day 6: Victoria Sponge
Prep Time:
Cook Time:
Yield:
Ingredients:
For the Victoria Sponge:
90g caster sugar
100g softened butter, extra for greasing
2 eggs, beaten
½ tsp baking powder
1 tbsp milk
some strawberry jam
some icing sugar
some sliced strawberry, for decorating (optional)
Method:
1. Preheat the oven at 190℃. Grease the mould with butter. In a large bowl, beat all the ingredients until you have a smooth and soft batter. Fill the mould until ¾ full. Put the mould in an oven proof mug.
2. Then, smooth the surface with a spatula. Bake for about 25-30 minutes until golden and the cake is cooked through.
3. About 10 minutes into the cooking time, when the cake start to fluff up and becoming solid, remove from the mug and let it lay in a baking tin so that it will be easily cooked through evenly.
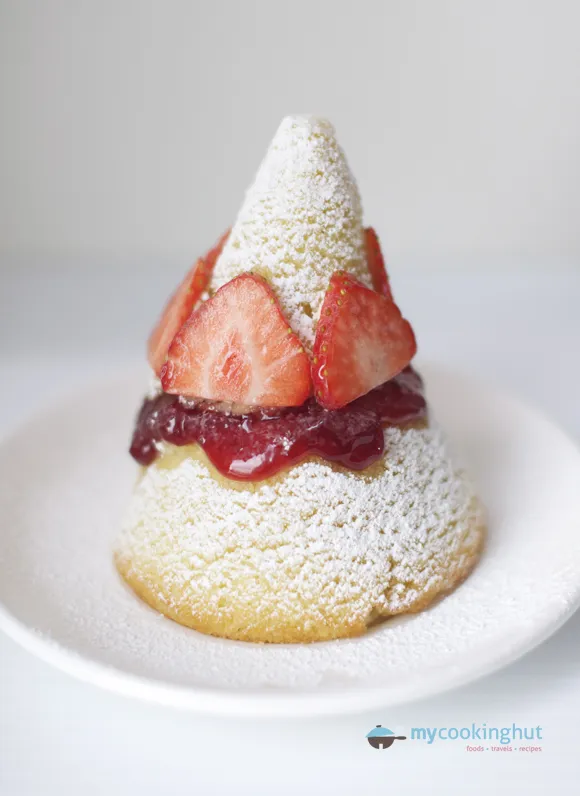
4. Put on a cooling rack and leave to cool completely. Remove from the mould. Cut the cake horizontal into half, spread generous amount of strawberry jam evenly on the bottom half. Top the upper half back to form a cone.
5. Dust a little icing sugar before serving. If liked, you can decorate the upper half of the cake with slices of strawberry.
Thta is such a great idea! I love your unusual Victoria Sponge.
Cheers,
Rosa
Merci, Rosa!!
Gosh! You really are innovative! Just the right person for this challenge! 🙂
Sylvia,
Thanks for your sweet words! I just try my best to see what I could do.. 😉
leemei i have to give you solute, very smart of you! you are very creative and inspired. thank you for sharing 🙂 go and rockin!
Thanks, Ira, for your kind words and support! I will keep it up!
Ingenious. My kind of food.
How big are these dishes that you are making? I was thinking about the spaghetti one and wondering how long it took to wind the spaghetti round!
But this one is elegant and divine looking. Thank you for sharing your adventure with us.
The recipe for the victoria sponge will make 2 of the jelly moulds that can feed around 3 people.
As for the spaghetti, it took me less than 10 minutes (my estimate) to wind the spaghetti around. Once you get started, it will be pretty easy after.
I hope you like what I have created so far. 😉
Great idea to “clone” the mould for baking!
Thank you!
It not a queen bufday today rite? hahaha wow..normally I just made Victoria sandwich using the round or square pan..Very creative of u..and I love this cake too.Have it with Jasmine or Lemon Tea…whoaa…
Love the idea of having it with Jasmine or Lemon tea. 🙂
Very clever, we never thought of this but used the mould as a pastry shaper instead for our next recipe. Nice touch with the strawberries too, well done!
Thank you! I am looking forward to your recipes.
Who would have thought. A con-shaped victoria sponge. Smart!
Thank you. 😉
oops! cone. sorry for the typo
ok – i cannot believe your ingeniuty – WOW! i LOVE victoria sponges!! 😀
Wowow this is getting more and more interesting….. great idea to assemble your Victoria sponge cake 🙂 really salute you.
Oh this looks great! Love the British-ness of this. 🙂
Thank you, Su-yin. 😉