
Photography
Tips on Food Photography
![]()
![]()


Yes! Tips on Food Photography! I have been following her blog for quite a while and I am always very very impressed by all her dessert shots! They look so yummy that I wish I could take them off the screen and have a bite!
You probably would have guessed who I’m referring to. I am very honoured and happy that Helen, the blog owner of Tartelette has put together a very good piece of information with photo illustrations, sharing with us her views and tips in food photography. Or, to be precise, desserts photography.Her photography is amazingly beautiful and elegant; not to mentioned about her baking skills! Please welcome Helen today to share with us her tips in photography desserts!
Leemei asked me to come talk about my food photography at the same time as I was about to do a FAQs for my blog so I took it as a sign I had to sit down and put my answers in writing.
I am not here to tell you what you should do and to only do what I do but rather to tell you what works for me and the things I have learned and integrated in my own photography these past few years. When it comes to food photography work flow is very personal and I only shoot desserts, which is a different beast than shooting savory items but I hope that you will find some useful tips in my experiences.
Remember that nothing is set in stone and all rules can be bent to achieve the result you desire and that what works for me may not work for you. Practice, practice, practice!
Whether you have a Point and Shoot or a DSLR, know that the equipment does not make the photo or the photographer. The reason why I upgraded to a DSLR is primarily because I wanted more mega pixels and higher resolution pictures for prints but also because I felt I had exhausted the use of my point and shoot and was ready to graduate.
I have been food blogging for a little less than 3 years and started with a Canon A610. Last February, I upgraded to a DSLR, a Canon Rebel XTi. I got the body only, forgoing the kit lens that would usually come with it, and bought a couple of prime lenses.
The first one was a Canon 50mm f/1.8 which I absolutely love and is a great investment at around $80. The second one was a Canon 100mm macro f/2.8 which was more expensive but if you keep an eye on photo equipment brokers like KEH and B&H, you can get great deals at great quality. Having a couple of prime lenses is a great investment: quality is high and they often have a wider aperture range and you can treat them as zoom lenses by just moving back and forth close and away from the food as you wish.
Even if I solely shoot with a DSLR now, there are still basics that apply to all cameras whether you shoot film or digital, point and shoot or SLR.
1) Light and Lighting
I shoot solely in natural light. I have nothing against using flashes when it comes to photographing food but it does require a new learning curve and equipment that I do no budget in right now. I also do not use artifical lights like light boxes, nothing against those either but I am very lucky to live in the South where there is a lot of sunshine and the room where I shoot is very well lit.
When I first started shooting, I used the coffee table next to the kitchen, with two large windows to my left. But I like to collect props, backgrounds and combined with the minimum photo equipment that I use, all this was becoming a sore sight for my husband, too tempting for the dogs to chew on and a pain to move when we had visitors. I moved everything to a different room, bought a large piece of plywood that I stained and set it up on 2 saw horses as my photography studio. I use some space in the closets for props and such and I can actually sit down and plan things better.
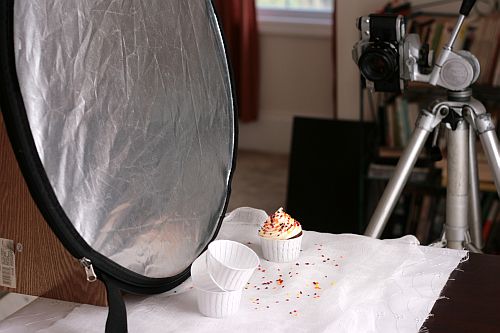
2) Light-Tools
I do use a couple of tools to enhance the natural light which in returns reduces the amount of editing I do to the pictures before blogging them and can take a plate from flat to “Yum”! piece of thick white cardboard to bounce the light back on the right side.
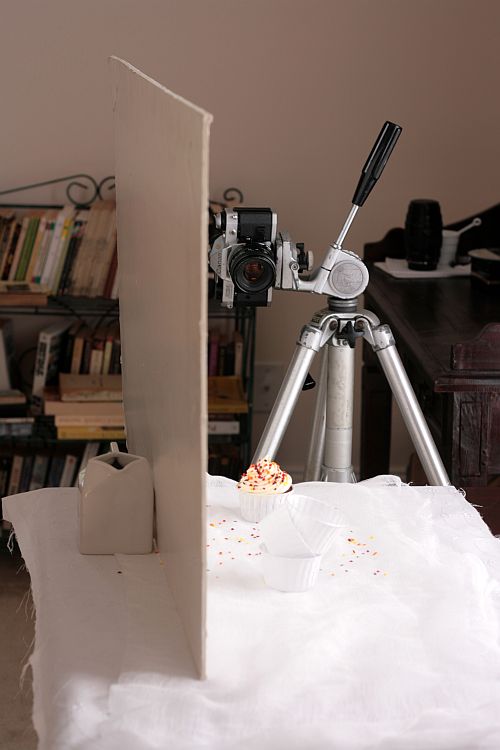
It brings light all around a dessert and on the side that is not exposed to the light. (See picture below)
I also have a couple of reflectors ($25) that I hold with one hand while pressing the shutter button with the other.
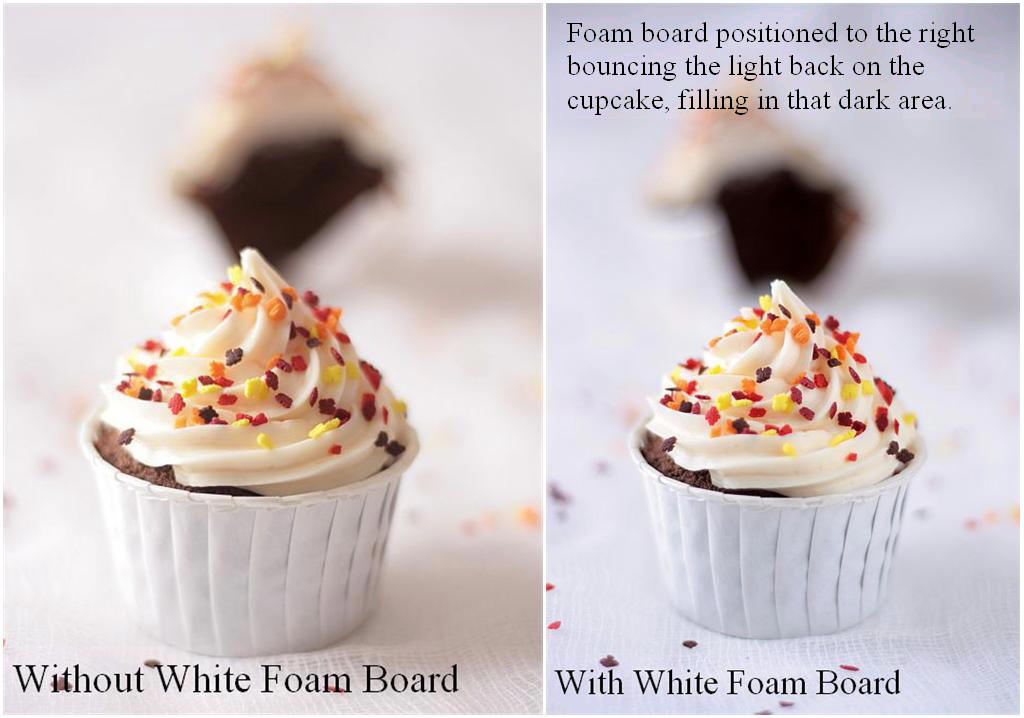
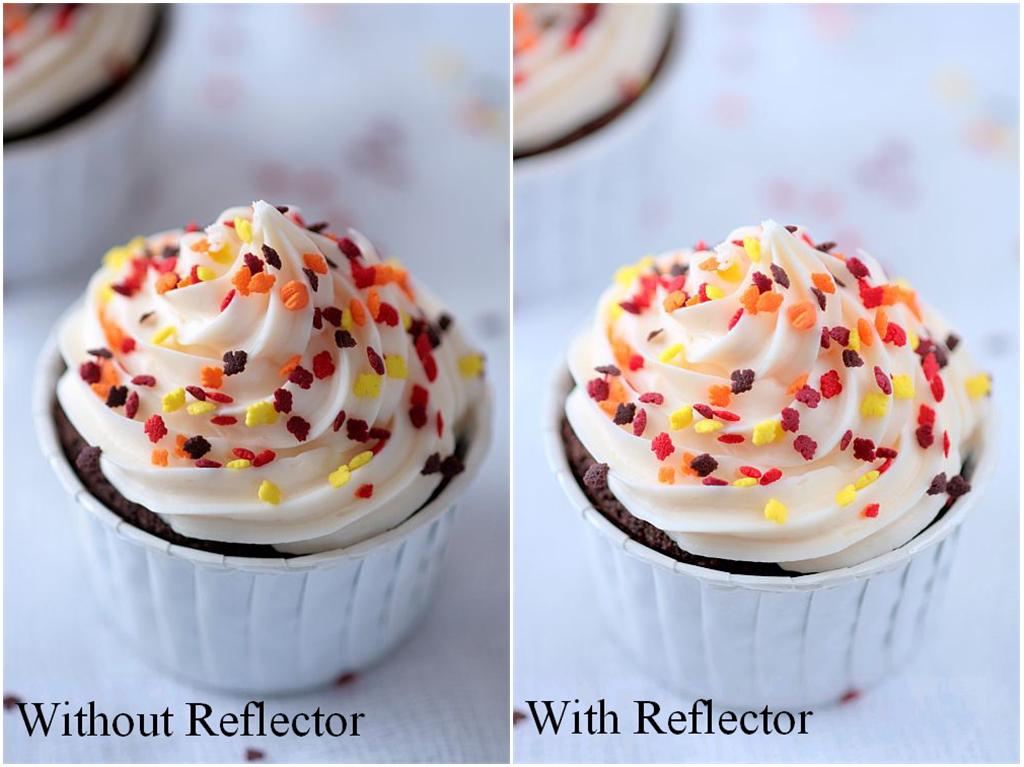
In the diptych picture of the cupcakes, one is shot without the silver reflector which is good but a bit flat. The other one is shot with the reflector positioned to the right and it helps bring more definition and clarity to the item.
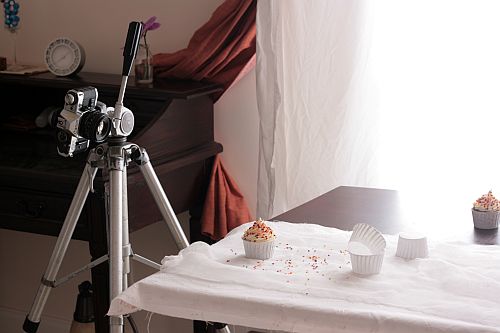
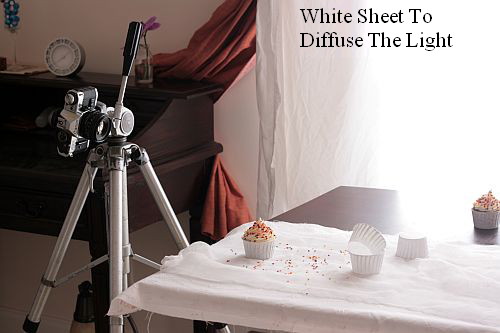
Even a subtle enhancement can make a huge difference when you start picking pictures apart. For the pumpkin meringue tartelettes that I shot recently, I only used the foam board as I found the silver reflector was giving the meringue a metallic hue that I did not like. The best time to shoot in winter for me is 8am-2pm, after that it is pushing it a bit. Around 11am though, there is a bright glare coming through so I use a thin white sheet of fabric to diffuse the light.

It helps when there is too much brightness or too much yellow entering the room. During summer, the sun is positioned at a different angle so I don’t use it that much and I can shoot until 4pm and still get good light. There is indeed such a thing as too much brightness sometimes, so, a diffuser (like a simple white bed sheet) helps take away the glare in a room while keeping the light coming through.
3) Set ups- Consistency
After I moved to a different room for my photo shooting, I set up my work table the same way with the light coming from the left. Not that I am too stubborn to learn new things but I “knew” that light, I had been growing with it for over a year with my point and shoot and I was comfortable with it.
Try to find consistency for where you shoot, you will think less about what to do around the food and you will be able to focus more on the food. If you know your photography surrounding, you can actually take time to set up a shoot even if you wish to keep things simple. It is easier if you plan your shot by keeping your photo area clean, clutter-free and ready to be used.
4) Planning
“Planning helps the unexpected happen”. My set ups are not complicated although I take the time to think them through but however you plan it, keep it simple so that the food you made really comes through. What sometimes I think will work when planned in my head, does not once on the table. Take the extra minute if you can to rearrage elements around the dish you are shooting. I am the worst at shooting step by step pictures but I do like to shoot different stages of a dessert making.
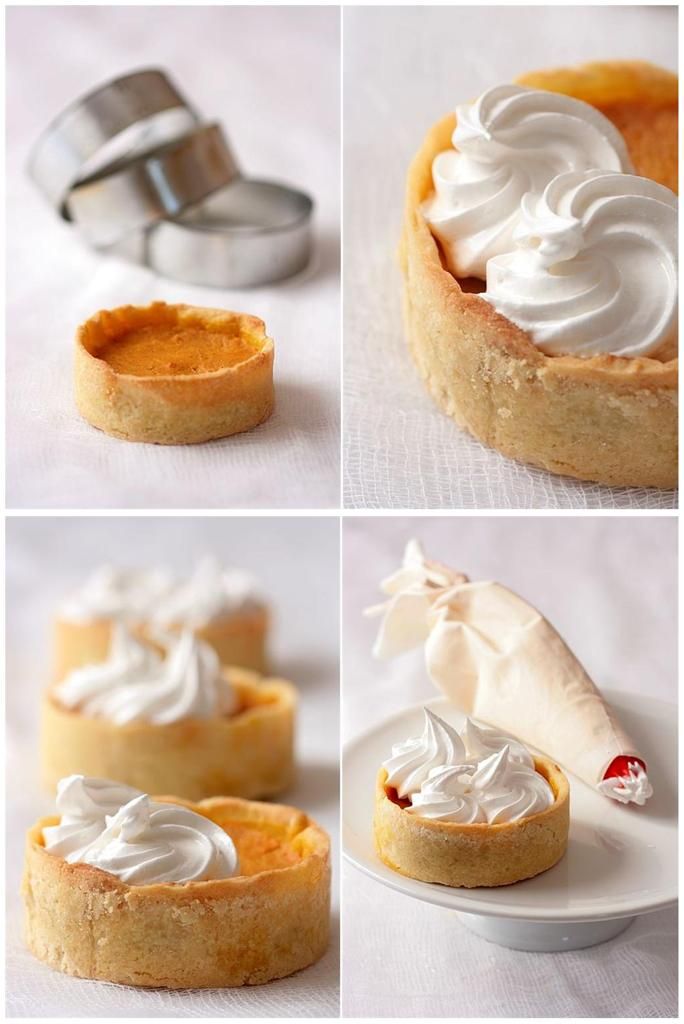
For the grouping of tartelettes (picture below) from the just-made stage to the meringue stage, I planned things in my head and took the time to shoot the various stages to illustrate the final image. You can do the same if you like to shoot your mise en place, intermediate step of a recipe, etc, and you can make as little or a lot stylized as you want, it’s up to your own style. Plan your surroundings before you start so you can focus on the dish and not fiddling around the kitchen trying to find a corner to set a cutting board full of veggies, a saucepan with a bubbling sauce, etc…
A tripod is very helpful in that regard. I love my tripod for the obvious reason that I have shaky hands but also because I can set up the camera settings for a tricky shoot, walk away, plate everything up and just set it down and press the shutter button and hop! It’s in the box.
I also need it since one hand is on the camera button and the other is holding and moving either the reflector or foam board. I can also set up a frame, look through the view finder and literally reach the table to position plates and props without losing and angle I like.
Never think of a tripod as a clunky non-moving piece of equipment. Mine travels around the table, gets close or far, head goes up or head goes down….never a dull moment! It is especially helpful when shooting liquids in motion like here when I was pouring hot chocolate in a cup and shooting at the same time or when photographing ice cream.
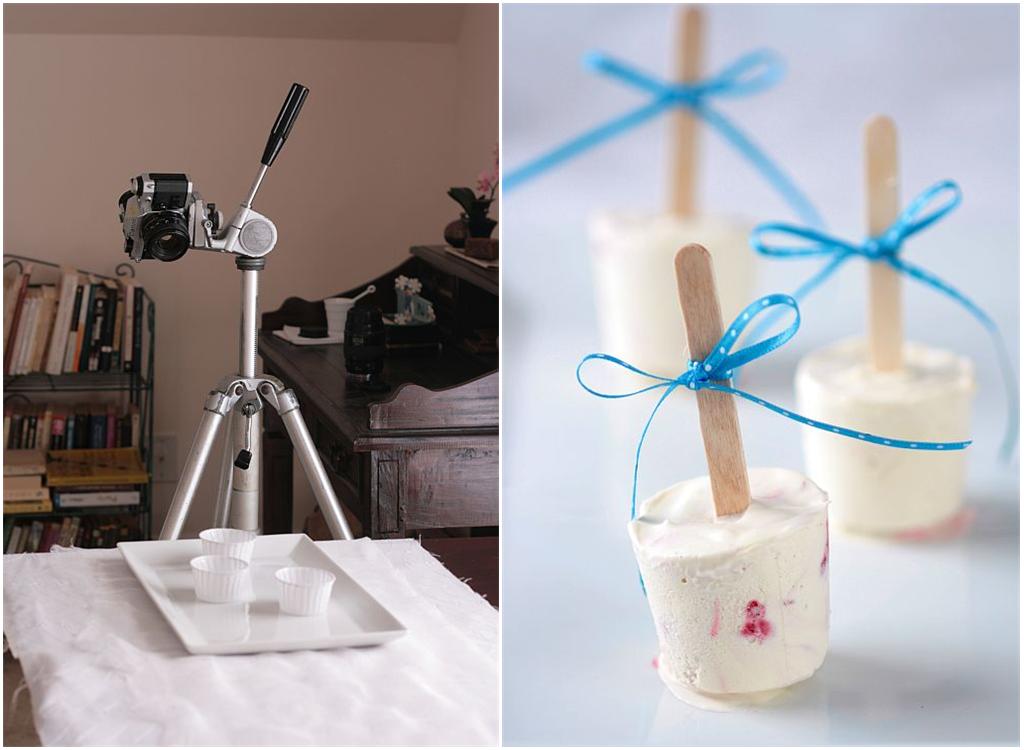
For the ice cream lollipops below, I had to move quickly because it was very hot that day and I knew the ice cream would be melting in a few minutes, not leaving me much time to play with the camera set ups and shooting angles. I set up the plate with empty cups according to where I wanted the final lollipops to be, set up the tripod and camera settings and when I was ready to shoot, I replaced the empty cups with the real ice cream and shot. Stress free!
5) Props
I have white and dark backgrounds, I have some colored ones too and I start by thinking which ones will put the dish forward, which ones will make it jump to the eye. I usually lay a piece of fabric flat on the table since it is fairly long but I sometimes prop it up to use as a backdrop. The cupcakes for example were shot without a backdrop, just on a piece of cloth whereas the tartelettes here were shot with the sheet propped up by a box behind.
I try not to use too many different fabrics because I tend to forget easily what I have. When I started I went to fabric stores and purchased one yard each of different fabrics I thought would be good as backgrounds. Different whites, different textures, some pinks and red, blues and dark. I also found out that the more prints were on the fabric the more confused and distracted my eye would be when looking at a picture. White is almost foolproof and easy to play up or down with the addition of a colorful plate, napkin or utensil. I like dark backgrounds when I have some desserts that are very vibrant with pinks, fuschias, orange and red.
Crockery: Well, it all depends on your taste. But again, less is more when it comes to props. Let the item speak for itself and enhance the set up with just a few pieces like a fork, a square plate instead of a round, a pretty bowl, a colorful napkin. I like to take one picture of the item by itself and then a few with a couple of props trying to fill the frame or not. Again, let your instinct speak to you. Areas left blank can sometimes bring the eye straight to your point of interest. Sometimes, a well placed spoon or napkin can make your dish stand out. Use your own judgment and remember to have fun.
6) Camera Settings
ISO: No matter the light I shoot at ISO 100, even when it is cloudy. There are far more less digital noises at lower ISO and that allows you to retain a higher quality of your pictures. Granted that higher ISO allow you to retain a fast shutter speed and decrease blurry images. But, since I shoot with a tripod and my food is not moving, I move around it and set the tripod to where I want to shoot from, I can keep a lower ISO and keep on shooting.
If you have a point and shoot camera, you can set up the ISO to a lower setting but you won’t have the possibility to use the light as well as with a DSLR. When I had my point and shoot, I would always make sure I had plenty of light in the room and I would shoot with the aperture program and the macro setting on (the little flower icon).
White balance: I believe that it really matters where you live as I most often shoot with the “daylight” setting on instead of the “automatic white balance” one. But nothing is set in stone so I will try both on one item before I start shooting and decide which one works better for the type of lighting (winter versus summer) that specific day. Again, the best thing to do is to play with all the different setting in you camera to find out the one you like best. The beauty of digital is that you can always erase!
Settings: I shoot with the Aperture setting of my camera. I am really comfortable with it but when I first got the XTi, I put a couple of cupcakes on the table, set up my tripod and shot the same item with 3 different f/stops (open-medium-closed to see the difference) and with all the different program (manual, aperture, shutter speed) to see which one I liked best.
F/stops: The next step is to learn your f stops! When I first started taking pictures for the blog I was captivated with shots of perfect focused plate and blurry background. How did they get such great depth of field? With the 50mm lens I have the widest f stop (=aperture) is 1.8 and with the macro it is 2.8.
The aperture is what lets the light through your lens when you shoot. An open aperture refers to low numbers like f/1.4 or f/1.8 for example and a closed aperture can be f/22 for example and you can set it either way with your camera settings.
If it is confusing to you just remember it like this: an open aperture will let more light go through the lens but will focus on a smaller point in your picture frame, leaving a lot of object in the foreground background blurry creating a shallow depth of field. A closed aperture will bring less light through the less, and more will be in focus in your frame, (less blurry) and with a deep depth of field.
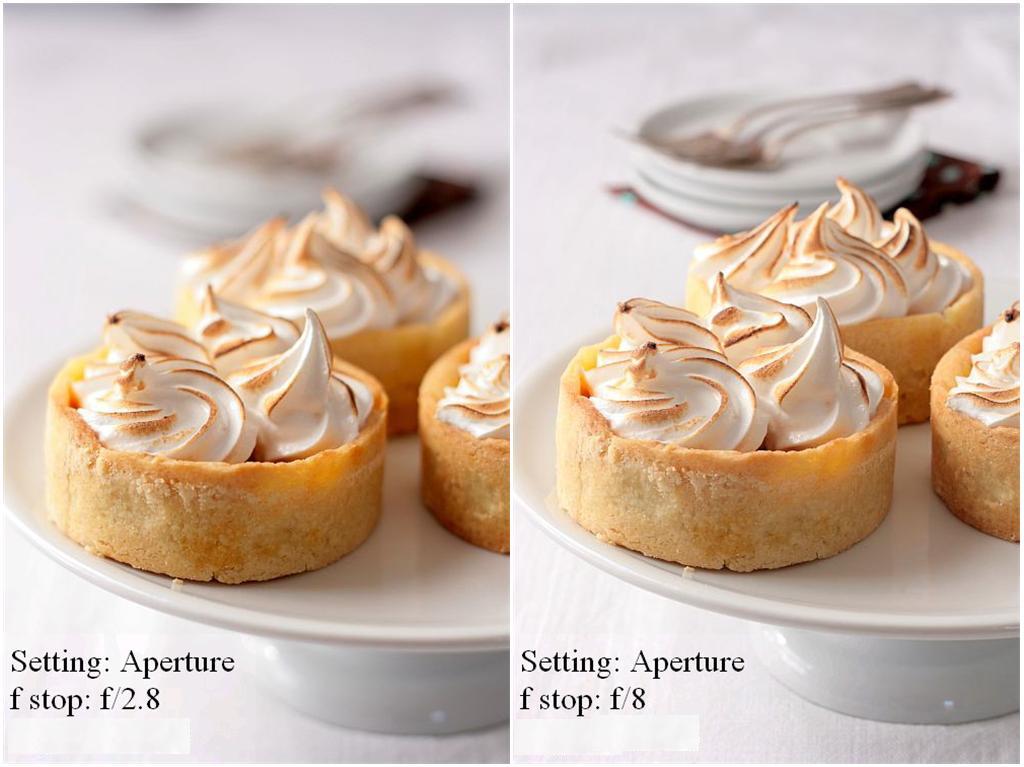
I like to play with both depending on what is in the background. For example in the tartelette picture below, in the picture on the left with the wide aperture it is hard to tell what is in the background? Spoon, plate, napkin? By bringing the aperture to a closer setting, the background becomes more in focus and it is easier to suggest an item.
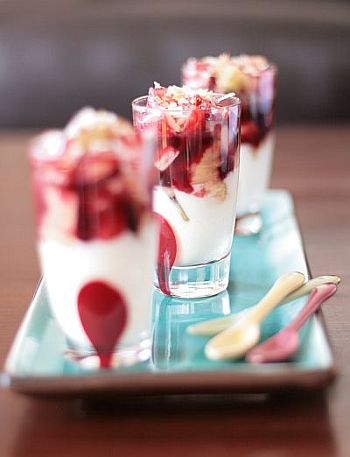
Having a wide aperture helps bring one specific thing in focus in a grouping. For example, the picture of shot glasses below. Your eye identifies a group but focuses on only one item drawing your attention in at the same time. I stay within the 2.8-5.6 f/stop range which gives me good amount of focus on the food forward and good depth of field in the rest of the frame.
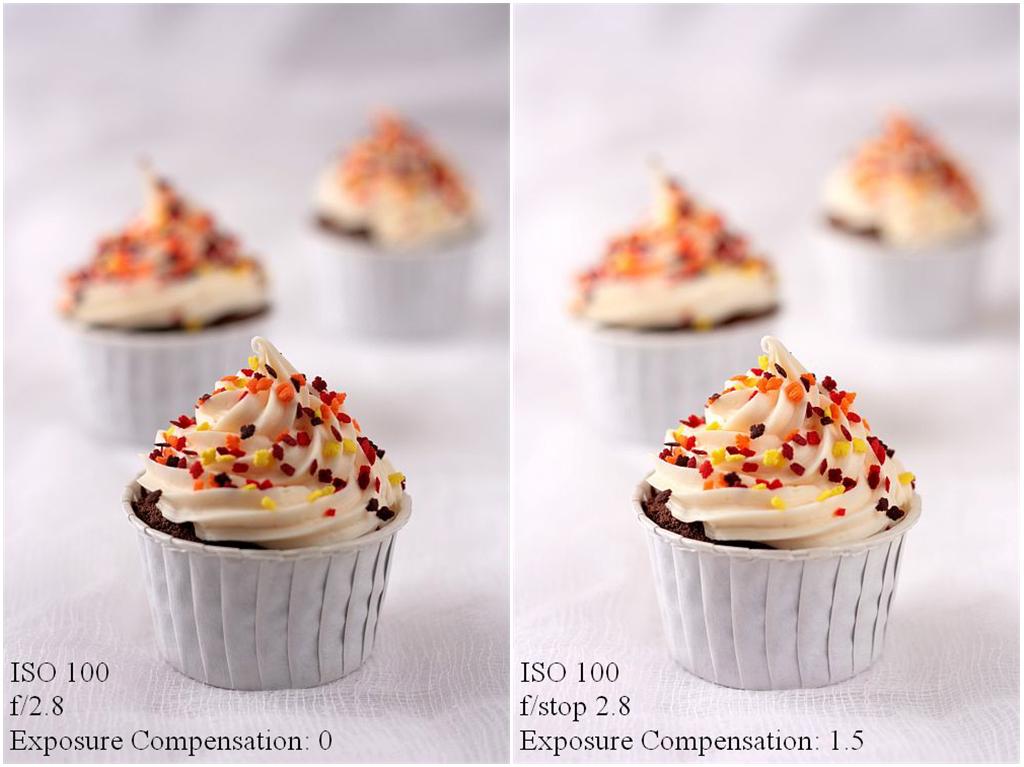
Exposure Compensation: It is my “easy” way to fix light issues. On my Canon it looks like a little button with AV+/- and it allows you to increase the light in the picture even at high aperture. It is my little lifesaver when the skies are cloudy and I “must” shoot something and I don’t have time to play with the shutter speeds and apertures. See pictures below:
7) Picture Editing
I shoot in large format in both RAW and jpeg. Think about raw pictures as negatives: they are not readily usable as pictures but contain all the data you need to create a picture. I do not use Photoshop but I combine use GIMP (GNU Manipulation Program) which is similar to Photoshop (I sometimes use Picasa from Google) to look at the jpeg files and the program that came with my XTi to edit the RAW files and convert them to jpeg to be uploaded on the blog. There is a lot less “lost” in quality (digital noise and pixels) when working from RAW files and it is worth to take the extra time when I see the results in printed materials for example.
My picture editing is pretty minimal: contrast, maybe some boost of light or some shadow, and sometimes a little boost of colors with a little saturation. I like to shoot the same frame at least 3 times, with different f/stops, exposure compensation and/or different white balances to see which one will require the less editing before being blogged.
I hope you were able to gather some tips and info from this and remember that there is no other way to improve than to take the time to practice and read more about photography and that in the end: do what makes you most happy!
Thank you Leemei for having me! It was a fun post to write. I forgot to mention that the camera on the tripod was not my actual camera but an old Canon film one.
Really like the way you did it! It was unbelievable… I`m a photo-begginer and only start to learn some cool stuff about shooting, but this my favourite one yet! The cool thing that it can be applied not only for food – horizins are not limited – notebooks with nice handwriting, old photos, pen, clock on the table – this is only one of thousands of ideas wich you can reach.
Thank you for great advice! Still, it was amazing! Very inspirational!
thank you, thank you, thank you! i’m a newbie photographer, or person who takes pictures using a camera, and have learned so much from this post. i’m going to print it right now for future reference. helen makes the most delicious recipes and her photos are always amazing.
Great tips, thanks! Those picture are delightful!
Cheers,
Rosa
Simply fantastic! I am really trying to learn as much about food photography as possible right now since I will soon be heading up a school cookbook project and we need to submit our own pictures for publishing.
I have enjoyed Helen’s blog for quite some time now and her photos are always mouthwatering. Thanks to both of you for sharing this aspect of the food blogging world!
Amazing interview – really great tips! Wish I didn’t have to go to work and could use some of that prime natural lighting!
I learned some new stuff, thanks!
Amazing post, so useful and precise. Well done !
I always have photo-envy when I see the pictures posted on Tartlette. Thank you for sharing your secrets with us Helen!
Very good tips,easy to read and understand. I’ll definetely benefit from this post.
Thanks a lot!
Dropping by from Tartelette.
Thanks Leemei, for posting the secret behind the beauty of Helen food photos.
What a wonderful and well explained post. I’m bookmarking it!
Brilliant tutorial on food photography!
Great tips, Helen! Always interesting to read more about how people go about taking photos 🙂
Excellent post! Tks a million for sharing these great tips on food photography. It is indeed very useful to me as a newbie in food photography. 😉
this is great, and I am so glad you gave the Canon 50mm f/1.8 a shout out, I love that lens and recommend it to everyone. In fact, my (much pricier) f1.4 is in the shop and I’m using the f1.8 again, still works like a charm!
very fun post.
wow…this is the best food photography writing I’ve seen yet! bookemarked!
This is a great tutorial. It’s always interesting to see how someone achieves a beautiful image — and these are all beautiful images.
I’m bookmarking this and saving it for later – this was SO helpful! I’ve always admired Helen’s blog and her photography. I’m so glad she shared her tips with everyone! Thank you!
Now I see why your photos look so amazing. All this time I thought you had some elaborate multi flash lightbox setup going! You’re so lucky to have a nice bright how. I live on the 7th floor with windows that look out onto an airshaft:( Fantastic tips/post Helen. And thanks Leemei for getting Helen to tell all:-)
This was an amazing post! And, its cool that I have been with you while shooting, so it brings it all together. 🙂
I found this post reassuring.:)
I have dreams (don’t always come true) of taking great pictures and my set up of cardbaoard and stuff looks a lot like yours though my pictures are nowhere close.
Okay, so I’ve got to practise some more.
What a great post. I’ve learned so much from it.
I am amazed that you have been blogging for less than 3 years and are so accomplished! And you’re so willing to share your knowledge – fabulous!
I am new at photographing my delicacies, and am lucky to have your notes as a guide.
Thanks so much,
Dragana.
Thanks for the interview, and thanks to Helen for the simple, do-able tips!
This was a fantastic post, Helen! I’ve always admired your photos and I found this post very informative!
Oh, this is fantastic! Bookmarking this post; it’s just what I needed!
Great interview and tips! I am finally beginning to understand all the camera-talk my dad spouts! Helen, you are a fantastic teacher 🙂 Thanks for sharing all this!
This was so interesting to read. As someone who has admired your photos for sometime, I really enjoyed hearing about your process. You are very talented!
these are great tips and tricks and so well explained and photographed.
Thanks Helen and Leemei. this post is forever bookmarked!
Thank you Helen for this wonderfully instructive post and the images that help illustrate your advice. It’s so fun to see how other people work. Your images are always so pristine and lovely.
And thank you Leemei for this great idea! It’s a great service to all the pastry bloggers out there.
Those are such great tips! It is really great of you two to share it with us. I am forever complaining my food photography technique but I don’t know any other way.
As Veron said, this is going into one of my permanent bookmarked sites
I am soo gonna print that!! Thank you both!
What an awesome tutorial! I think I am going to print it out and go to the fabric store to buy different types of fabric, etc.
Thank you both!
Great article, Hellen! So helpful; I own Canon XT, and reading articles like this really helps to get the best use of it. It is always so cloudy and awful weather here in Michigan, so it’s hard to get a good picture without editing. Now I know what to do, lets just hope I get a handle on it 🙂
Thank you so much for writing this article!
Great tipS!I have to say though, that using a dslr instead of a point and shoot is crucial. It does not only help with printing and editing a picture, but it is basically a real camera.Point and shoot do not really have apertures, so you cant control the depth of field in reality. If they have an aperture setting ,it is electronic and not real. Also point and shoot have the worst lenses.These are the two basic differences, but they is a million more I wont state! I am just saying this so that people dont think they can achieve good pictures with point&shoot cameras. Yes, they might be able to take some ok pictures, but NOTHING like dslr cameras with good quality lenses. Keep up the good work!
leemei and helen…thanks a tonne…this is such a great post…lots of questions answered…and hope there for the point and shooters!!
just to add to the tons of other comments along the same lines – thank you so much for this post. it is super helpful and I can only aspire to take such great photos!
VeggieWedgie: I agree that that point and shoot cameras are limiting but I disagree on the fact that one can’t take quality pictures unless they have a DSLR. I did win many Does My Blog Look Good In This award with pictures shot with a point and shoot.
The camera does not necessarily makes the picture. One can have a great DSLR and great lenses and still shoot not so good pictures. Learning the camera, no matter what it is, is crucial. There are fantastic pictures of food shot with film camera 🙂
Wanted to add that I agree on the quality difference on printed material but DSLR are an investment, not a toy and not the solution to take good pictures alone.
I also do agree that with DSLR, better quality of pictures can be produced.
And like Helen said, by having DSLR doesn’t guarantee good pictures… just remember: Practice! Practice! Practice!! 🙂
Excellent and impressive Helene!
Someday I’ll grow up and get an SLR..
Did you mention which tripod you use?
Big Merci
Carolg
I was surprised by something here – no remote?
The tripod allows you to have a steady shot, but that can go for naught if pressing the shutter shakes the camera. For the XTi, a very cheap ($5 or $6) wireless remote can be found online, which has been a great tool for me. Especially if you’re moving around adjusting things, but know the camera is focused on the spot you want.
At the very least, a short timer setting will let the camera settle down after pressing the shutter release.
It is a very article; very helpful tips. Thank you for sharing!
Carol: the tripod is 30 years old so I am not sure the info will be valuable!!
Astin: This post is by no means complete. I do have a remote, I do use it but not all the time. Pressing the shutter button does not shake the camera while on the tripod. It could be that my tripod is a 30 yer old piece of steal that holds the camera really steady but I never see the tripod head dive down when I shoot. I use the timer set up and sometimes I don’t. If I move around to readjust things, I don’t see why I “at the least” need the timer or the remote, all I have to do is put myself back behind the camera and re-check the frame then shoot. I use the timer when I have the tripod further away than my arms can reach to hold the reflectors and push the shutter button.
Astin,
It’s a personal choice whether or not to have/to use a remote. I strongly believe that it’s entirely up to individual preferences.
I also want to reiterate that the guidance/tips provided are what suit Tartelette and it’s not something that everyone has to follow from A-Z. What suits her might not suit me, for instance.
But, of course, if any of the points suits any person, by all means, it’s good to pick up and put into practice.
I do have a remote but not using it all the time too because I believe things can be done in a flexible way as long as it suits individual.
I would like to say ‘Thank You’ for all the comments! 🙂
Helen is indeed terribly talented. Great opportunity to read about her work here.
I know of several food photographers that use these Lightright tabletop reflectors. http://www.lightrightreflector.com There adjustable angles offer a lot of control with these reflectors. Keep up the good work.
Gary B
Thank you, thank you, thank you! I have admired your photography from the very first moment I saw your website. Your food always looks top-notch and your photography skills…out of the ballpark. I’ve learned so much, now it’s time for the practice.
This is fantastic. I really appreciated with your helpful sharing!
LeeMei, it’s great to have Helen as your guest writer!!
Learned something new today, thanks Helen and Leemei.
I always admire Tartelette photos in her blog..her beautiful photos really amaze me.
This is soooo informative. Wow – thanks for sharing all of this information! I can’t wait to give some of your tips a try 🙂
Thank you so much for posting this. I’m a newbie too and I learned a lot. It’s true, practice makes perfect.
Excellent post! Great way to get to the nitty gritty without getting too technical.
Still, it’s the person behind the camera that makes the shot. The equipment and setting only take you so far.
Thanks for sharing all the tips for food photography. I am a great fan of Tartelette blog and always at awe at her beautiful photography.
Thank you so much for taking the time to share your secrets. Have bookmarked for future when I have those frustrating moments!
Oh, Helen, I wish I could give you a big hug right now! This article is a gem. Thank you for so generously sharing your knowledge with us. And thank you, Leemei!
“I only shoot in natural light” – weeping in frustrated envy 🙁 I work all day. The sun sets at 15h30 here in London at the moment. Do the math.
Other than my personal light envy issues (!) – what a great article, and I’m glad I’m not the only one whose husband just does not get the need for props… Thanks Helen and thanks Leemei for hosting the piece!
Thank you all for all the comments!
Jeanne,
We are in the same boat! It’s frustrating during winter where the days are short. That is why I need to depend on artificial light – softboxes during these days 🙁
Thank you for sharing so much valuable informations:-)
I’ve just discovered My cooking Hut today, and I like it a lot. Thanks again.
Love your tips. Thanks for sharing with us.
Helen THANK YOU ! I love food photography but I know nothing about it. I love the way you present & photograph your desserts. I always used to wonder how she sets her stage and all that. Thanks a lot you let us see how you do all that pretty stuff.
And thank you Leemei!
Thanks for sharing this with us…
Great tips!
I am so glad you wrote this post, Helen! I always love your images and I’ve been wondering what your set up is like. Thank you for sharing these tips!
Leemei,
If you don’t mind, I will make a link for this page on my multiply account. http://evimeinar.multiply.com
Thank you.
Pepy
Pepy,
Not at all!!
Thanks for the tips! These are really helpful.
Unfortunately, I usually take pictures of the dinners I make and there isn’t any natural light at that hour.
KK,
Thank you for your comment. I understand the limitation when there’s no natural light. That’s why I have to rely on my soft boxes. In London, where there’s good natural light, it’s like winning lottery!
Excellent tips. I also live in London, but the natural light in my house isn’t fantastic, and as it’s winter by the time i get home and cook the lights gone, one of the reasons (apart from the cold weather) i can’t wait till summer. Beautiful site by the way 🙂
Asma,
Thanks for dropping by and your kind words! It’s great to know another blogger from London!
Thank you very much for your very, very useful suggest….
I’m going to buy an entry level DSLR (non yet decidet between nikon d60 and canon eos450), and this post is very clear….your style is exactly what I belove :))
See you very soon!
Thank you for sharing such great information. I only started publishing in December and I use my intuition, but I am trying hard to be more skilled. I like the idea of having a set up ready at all times. I have many windows and so many choices, I get confused. Practice practice practice. Good advice.
I was just loooking for such tips, I need them for my food blog. I’m still a novice photograher as you can see on my blog. Thank you so much. I hope I’ll be more successful after this post.
Hello. And Bye. 🙂
Thanks for the cooking tips. One I like to remember is to never be too stressed. Enjoy what you’re doing and things seem to go (and taste!) better.
Thank you for sharing this informative information Leemei, it’s very userful for beginner like me.
I love your blog sooo much
WOW!!! This is really great! I always have problem taking homecooked food pictures at home. Now I can start to practice with your advices. Thanks!
Hi Helen,
Thank you very much for this fantastic post, I put a link to it on my blog. Since I read it I found a better place to take my pictures and I also happened on a function on my camera that I didn’t even know was there: exposure compensation:)) Thank you Leemei for hosting the post! Bye Sabrina
Great post about food photography!
I have long time admired blog tartelette and do not suspect that she was the author of this amazing article!
Can I translate this post into russian language? Of course, identifying the sources!
Thanks
Thank you all for the comments!
Olga,
Yes – of course you can!
Hi Leemei, just wondering what light source you use if there’s no daylight? I bought 2 daylight bulbs from ebay but the colour doesn’t seem right. I’ve been playing around with my white balance settings and am still not very satisfied with the results =(
Ann, (pigpigscorner)
I have softboxes that come with flourescent light bulbs. So, when there’s no daylight, this is the light source that I use. Daylight bulbs should be ok. But then again, what voltage I wonder?
On white balance, I always use Auto. However, on Nikon D90, I have several options if I switch it to flourescent, which gives shooting without much daylight a great help!
It’s difficult when there’s no daylight, esp in the UK, the weather is never predictable.
If you are keen, I would advise to get softboxes when daylight is not possible.
The bulbs are 30W. Softboxes? I saw some online but they are so expensive, that’s why I bought those lightbulbs =P Where do you get your softboxes?
Ann, (pigpigscorner)
Well, most of the time you need to diffuse the light to produce soft and smooth light. That’s what softboxes does – the diffuser soften the light to avoid harsh shadow/light.
2 x 30W should be ok. I have 2 softboxes, one with 80W and the other with 50W.
Yes – some could be expensive. But, try these websites and see which fits your budget.
http://www.backdropsource.co.uk/
http://www.viewfinderphotography.co.uk/
http://www.prokit.co.uk/
I’m using white cloths to diffuse the light actually. Thanks for the links! I’ll have a look =)
Thank you very much for providing this very valuable information to someone like myself, who is just starting out. These were very useful tips, which I intend to use. I would appreciate any other words of wisdom you might be willing to share.
Thank you for dropping by! I think we have to thanks for Tartelette!! 🙂
thank you it was very helpful
Thank you for sharing your knowledge and experience. Very helpful. I love the simplicity of your work.
It is wonderful information and this has been a world of help to me. Thank you Helen.
This is great info, jotted it all down in my notebook! Lots of great tips
Wow, this is so fantastic and informative. Thank you, Leemei for inviting Helen sharing her tips. As a newbie in blogging, I find this post very helpful! Thank you Helen for taking the time to write in all the details.
i've been searching thru so many photography sites for this info and here I am, in your cooking hut, reading exactly what i needed to know! Thanks a million.
excellent tips.. thank you so much, Helen!
Wonderful tutorial, Helen, many thanks!
I just can add: thanks for the useful tips. Love your blog, pictures and recipes 🙂
Very helpful for a total new beginner. Thanks for all the details. Your photos are amazing.
This is exactly what I need to know. Thank you. Of course, it will take me ages to implement the suggestions. I just started my food blog last month, am using a compact and know nothing about photography. Before I take on the more advanced tips, I am going to pick up some foam boards and a tripod.
that’s an amazing tips. Anyway, since I lot to take photos, I am going to apply these tips on mine
Cool photoes!
Pleasing to know that the path I am taking is very similar to yours. I too have a Canon Xti. First accessory was a tripod, then the same 50mm F1.8 lens, then the 100mm 2.8 macro, then the foam boards and reflectors. I'm pretty satisfied with the results so far. Trying to learn about lighting as I go. Thanks for the detailed post and comparison photos of before and after effects. Keep up the quality images and eat healthy.
I recently came across your blog and have been reading along. I thought I would leave my first comment. I don't know what to say except that I have enjoyed this. Nice blog. I will keep visiting this blog very often.
thank you!
nicoleta
Great… !!! I will definitely follow your instruction. You guys done a great job . Cheers
Thank you very much, I haven't seen so usefull post about this topic yet, congratulation!
IMHO it is quite interesting information. Simply saying i'm impressed. Thanks and good luck!
Very good guide. Quite clearly and simply.
See this is the kind of post Im looking for, I dont photograph food or anything I photograph fish but your tips and techniques for diffusing light and brightening up a space are fantastic.
Hummingbird Fish Finders
What a fantastic post…..so many tips…thanks for taking time to explain….
I really had a good time reading this posting. Helen is very generous in sharing her photography tips with us here. I am highly tempted to do food blogging now! Ha ha..or probably incorporate this tip into my gardening blog. Some props to add interesting angles into my composition. Thanks Lee Mei & Helen for bringing this posting to us here! Love it!
It's great that you find this useful! 🙂
What a wonderful and easy to read post! Thanks so much for taking the time to share!
I just started blogging a while ago and it feels great
I was very encouraged to find this mouthwatering site. I wanted to thank you for this informative and useful read with useful tips and great pics. I definitely savored every little bit of it including all the comments and I have you bookmarked to check out new stuff you post.
When it comes to food photography work flow is very personal.
I need to take lots of close-up pictures for my website. Your shared information has made me feel better about using the right light to get the best results.
So tempting 😉
Thank you for your great tips!
I am trying to learn food photography and have been to many related web sites. And I must tell you yours is one of the best I’ve seen. Greatly helps!
thanks for your great tips 🙂
I am new to the blog world and food photography. I think you have a wonderful set of useful tips that I will take back with me– it is making a lot of sense now:)
Thanks
Leemei and Helen, Thank you Thank you Thank you for this post.
such a great post! thanks a lot!
nice info.
very useful post, I must say !!
This is an excellent and helpful post. I like it so much I’m featuring it on Feature Fridays at Savoring Today. Thanks for sharing!
Just found this site – Love it! What lens do you use when shooting food? A macro?
I’m not even a food blogger and this post made my day. Crazy helpful. Super approachable. Thanks for the tips! I’ll be bookmarking!
This is what I call art! They look delicious! that delicious that I had to go out and buy some cookies.. 😀
Hi Leemei,
Great to meet you! We’re putting together resources to help foodbloggers take better photos. We’d love to include your post as a reference, and are asking your permission. Do let me know!
Cheers
Christine
christine@knapkins.com
Yes, please give credit and link back to my site, thank you!
Thanks for sharing this great infor. Enjoy reading very much!
Hi , thank you for this lovely post
you are such a “life” saver :))))
looks delicious
Great tutorial! I am trying to improve my food photography and am taking all the help I can get!
This is very well-written. It’s always encouraging to see the behind-the-scenes and “What?” and “Why?” when it comes to photography – no matter how much experience you have. Your images are great, full of clarity and catchy color. Will definitely be coming back!
Congratulations both you Helen and Leemei, and thank you so much for such good photography tips!!
I’ve just bought a few days ago a 50mm f1.8 objective and is good to know I’m on the right way 😀
Take care and thank you!
Thank-you for the tips…I will try these in the future…….beautiful beautiful 🙂
Great tips. I admire Helen’s photography.
Wanted to know what tripod she has because I was looking to buy one too & needed some ideas, but read in one of her comments that it’s 30 years old. Ah! Anyway Leemei, what tripod do you use?
Thanks,
Nisha
Hello Nisha,
I have a Manfrotto tripod. 🙂
Excellent post! Thanks a million for sharing these great tips on food photography. It is indeed very useful to me as a newbie in food photography.
Hi! I will definitely follow your instruction. You guys done a great job. Thanks.
Thank you!!!
What a great tutorial! I’m going to buy myself a tripod. I really could use one. Beautiful photography. 🙂
Thanks a lot ! I’ve been looking for so much time for this kind of explanation. My best friend will have her birthday on Saturday and we’ll go to a famous restaurant in Carnac (France). so I will try all you say in this tuto !…. (hope I will be a “good learner” 🙂
I have never seen such a clear post with each and every detail. Love it so much… Thanks for the pictures too.. So good!!
Glad you love it. 🙂
I have looked at several others post about food photography, but yours was by far the most informative and helpful. My apartment doesn’t have much lighting areas, but I am going try some of your tricks!! Thank you again for the helpful post.
I’m fan of Hélène, she’s one of the best food photographers ever! here she shares her knowledge in such an humble and simply way. Thank you!!
I am trying to learn food photography and have been to many related web sites. And I must tell you yours is one of the best I’ve seen. Greatly helps!